
Chest Tube
last authored: Feb 2016, David LaPierre
last reviewed:
Introduction
The chest tube, or thoracostomy tube, is a large-bore catheter placed into the pleural cavity to remove air or fluid.
In the case of chest trauma, a chest tube should be placed as soon as possible, in a location away from the wound. Before this, tape an occlusive dressing with three sides taped down, over the wound.
In the setting of a hemothorax, a chest tube can be used to remove blood, expand the lung, and allow monitoring of blood loss.
Equipment Required
Selecting the appropriate chest tube
trochar chest tube
- large bore: for trauma or other emergency
pneumothorax catheter
- for stable pneumothorax,
where minimal fluid expected
indwelling catheter (eg PleurX)
- chronic effusions, for long term use
Supplies that are required include:
- local anesthetic, with appropriate needle and syringe
- sedation (as warranted)
- surgical prep: alcohol, betadine, or chlorhexidine
- surgical drapes
- sterile gloves
- mask
- #15 scalpel
- forceps
- chest tube
- suture
- large occlusive dressing
- waterproof tape
- suction or drainage apparatus
- clamps to be kept at side of bed
Relevant Anatomy
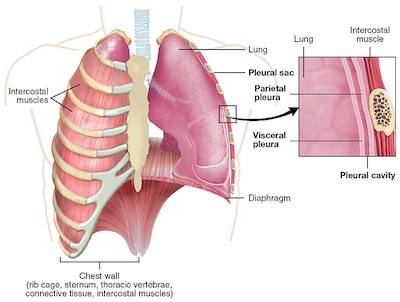
used by permission, OpenStax College
Chest tubes are inserted through the skin, between ribs, through the intercostal musculature, and finally through the pleura to enter this space.
Arteries, veins, and nerves run alongside the inferior surface of ribs. As such, it is imperative to stay alongside the superior aspects of the lower ribs when inserting a chest tube.
Landmarking
Confirm the affected side.
The insertion site is normally the 4th or 5th intercostal space (nipple line), just anterior to the midaxillary line.
Procedures
Video(s) and images to be added here
Insertion
Ensure all needed supplies and personnel support are available.
Obtain consent.
Set up the drainage system.
Identify the insertion site, as above. Mark using a fingernail or pen cap.
Don a mask and sterile gloves.
Surgically prepare and drape the site, using sterile technique.
Provide local anaesthesia to the skin and rib periosteum, along the superior aspect of the lower rib.
Make a 2-3 cm horizontal incision in the skin.
Using the forceps, bluntly dissect down through the subcutaneous tissues, staying along the top of the lower rib.
Using a clamp, puncture the parietal pleura. Insert a sterile gloved finger to displace clots or adhesions, as well as to avoid further tissue damage.
Clamp the tube and advance it into the pleural space. If a hemothorax or empyema is suspected, the tube should be aimed posteriorly and inferiorly; if a pneumothorax is being treated, the tube may be aimed more superiorly.
Confirm placement by listening for air movement and looking for fogging.
Manually remove fluid with a large syringe or connect to an underwater-seal apparatus. A Heimlich, or flutter valve, may also be used.
Suture the tube in place.
Apply an occlusive dressing and tape tube in place. Tape each connection.
If suction is warranted, attach to suction device and set to appropriate level.
Obtain a chest X-ray to confirm placement.
Monitor vital signs, including pulse oximetry. Consider arterial blood gases.
Setting Up Drainage System
There are a number of drainage systems that may be considered.
The simplest is a Heimlich valve...
One, two, or three bottle systems may be used. Maintain the drain below the chest tube, either by hanging from bed or placing on floor.
Disposable devices may also be used...
Complications
Chest tube placement, if done improperly, can result in significant injury or death. Complications can include:
- laceration of thoracic or abdominal organs
- infection
- damage to artery or vein (creating a hemothorax)
- damage to nerve (causing chronic pain or other neurological symptoms)
- persistent pneumothorax
- subcutaneous emphysema
In Children
Chest tubes should be smaller than in adults, ranging from a 10-14 Fr tube in infants up to a 28-38 Fr tube in adults. This should be guided by a Broslow tape.
Landmarking should be the same, though the tube should be tunneled over the rib and angled superiorly and posteriorly.
Management After Chest Tube Placement
Monitoring clinical status
Pain control
Positioning
Activity
Care of tubing
Drainage
Chest Tube Removal
The chest tube should be removed when:
- the clinical status has sufficiently improved: symptoms, vital signs, and equal breath sounds
- radiological evidence of fluid or air has resolved
- drainage is significantly reduced or stopped
To 'test' the effects of removal, the tube may be clamped for several hours, monitoring clinical status and potentially radiographic resolution.
Removal is normally done at the bedside. To proceed with removal, ensure you have needed supplies, including:
- personal protective equipment, including gloves, gown, mask, and eye protection
- suture removal kit
- tape (pre-ripped)
- 4x4
- vaseline gauze
Don PPE.
Lay out the gauze and apply vaseline.
Explain the procedure to the patient, making the process much easier.
The goal is to get tube out without allowing any further air entry into the pleural space. This is most effectively accomplished by increasing intrathoracic pressure, by asking the patient to bear down against a closed glottis (the Valsava maneuver).
Remove dressings.
Support the chest tube and remove the sutures.
Ask the patient to take a breath and bear down. When they do so, pull the tube out and immediately apply gauze with vaseline in place.
Tape thoroughly.
Keep the dressing in place and dry for 48 hours, at which point a small dressing may be applied and showering may resume.
Followup should be organized in a few days to ensure the wound is healing well. Alert the patient for signs and symptoms of infection or respiratory decompensation.
Resources and References
American College of Surgeons. 2004. Advanced Cardiac Life Support manual.
 |